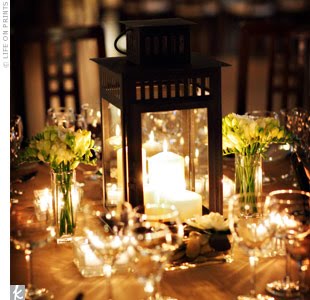
So I have been playing around with DIY centerpieces for a while and I think I know what I'm going to do...here's what I've come up with so far. World Market sells these lanterns that are nice and big- you can fit three candles inside and they are so cute! Here's what I was thinking of:
I was thinking of placing a few grey river rocks around the lantern with either tulips in a vase like above or a few more candles. I grabbed the rocks from a place down the road to try out the idea of placing rocks around the lantern, here's how it turned out:
I like it- of course I'd replace those rocks with smooth ones like these:
I think it will turn out well. :)
Forever Dreaming,
Katelyn
Showing posts with label DIY. Show all posts
Tuesday, August 3, 2010
Sunday, April 25, 2010
Creating my Invitations
So today was the day I was going to make all my engagement party invitations. Last night I cut the paper, today I got grey stamp ink, and as I went to load the paper into our printer it suddenly hit me...we don't have white ink. Bummer! I already tried the invitations with black ink and here is what it came out like:
Materials Bought:
10 pieces of 12x12 olive green cardstock paper....$6.90 ($.69 each)
1 9" Fiskars bypass trimmer (as seen below)..........$19.99
4 packs of 12 note cards-only for the envelopes.....$4.00 ($1.00 each)
1 fifty count 8x11 white cardstock paper................$3.99
2 stamps on clearance (as seen below)...................$1.98 ($.99 each)
total cost: $36.86
Why this ended up being a total bargin:
The trimmer I will be using forever more, for things such as gift tags, cards to friends, crafts, etc. The same with the stamps (who doesn't love a cute little owl?). The white pack of cardstock paper I will be using to make my banners, save the dates, stationary. and who knows what else more.
And finally- my best bargain find- The 4 pack of note cards with envelopes came to a total of $4 which totally beat the plain cardstock note card with envelope pack which was $4.75 for a pack of 10. Tadah! I felt great walking out of there with out spending the $50 I originally thought I was going to have to spend.
Now for the creation process:
Step 1: Cut cardstock paper into whatever size you need. (My invitations are 4"x7.5".)
Step 2: Print out whatever text you like onto your cardstock paper. Mine read "It's the little things you do, that truly say "I love you". (cute, huh?) Also print out the text on your small cardstock paper for the insert card (the one you place in the envelope).
Step 3: Using a glue stick, glue your envelope (back side up) onto your card in the designated area.
Step 4: Stamp adorable designs where ever you would like.
Step 5: Apply postage stamp and mail these cuties off!
Send me some pics of what you're working on!
Forever Dreaming,
Katelyn
(Ignore the smudge marks on the envelope...I dropped a stamp on it. lol)
So you see, the black doesn't look terrible but I think white text against the green would look much better. But anywho, here's the invitation making process so far:Materials Bought:
10 pieces of 12x12 olive green cardstock paper....$6.90 ($.69 each)
1 9" Fiskars bypass trimmer (as seen below)..........$19.99
4 packs of 12 note cards-only for the envelopes.....$4.00 ($1.00 each)
1 fifty count 8x11 white cardstock paper................$3.99
2 stamps on clearance (as seen below)...................$1.98 ($.99 each)
total cost: $36.86
Why this ended up being a total bargin:
The trimmer I will be using forever more, for things such as gift tags, cards to friends, crafts, etc. The same with the stamps (who doesn't love a cute little owl?). The white pack of cardstock paper I will be using to make my banners, save the dates, stationary. and who knows what else more.
And finally- my best bargain find- The 4 pack of note cards with envelopes came to a total of $4 which totally beat the plain cardstock note card with envelope pack which was $4.75 for a pack of 10. Tadah! I felt great walking out of there with out spending the $50 I originally thought I was going to have to spend.
Now for the creation process:
Step 1: Cut cardstock paper into whatever size you need. (My invitations are 4"x7.5".)
Step 2: Print out whatever text you like onto your cardstock paper. Mine read "It's the little things you do, that truly say "I love you". (cute, huh?) Also print out the text on your small cardstock paper for the insert card (the one you place in the envelope).
Step 3: Using a glue stick, glue your envelope (back side up) onto your card in the designated area.
Step 4: Stamp adorable designs where ever you would like.
Step 5: Apply postage stamp and mail these cuties off!
Send me some pics of what you're working on!
Forever Dreaming,
Katelyn
Labels:
Budget,
DIY,
How To,
Inspiration,
Tips,
Wedding Invitation
Friday, April 16, 2010
Free Invitation Templates!
I just found some wonderful sources through a few of my favorite wedding blogs. The first I found through iDiY and is a blog with free invitation templates. You just download them into word, add your info, and print them out on some great paper. Check out these beauties:
You can find these and more templates at Download and Print. I suggest subscribing to the blog- she's adding new templates almost every day!
The second free template I wanted to share with you I found at The Wedding Chicks. Look at these adorable groomsmen cards!
Love them! You can find and download this template here.
Oh how I love freebies!
Forever Dreaming,
Katelyn
You can find these and more templates at Download and Print. I suggest subscribing to the blog- she's adding new templates almost every day!
The second free template I wanted to share with you I found at The Wedding Chicks. Look at these adorable groomsmen cards!
Love them! You can find and download this template here.
Oh how I love freebies!
Forever Dreaming,
Katelyn
Labels:
DIY,
DIY Template,
Freebies,
Wedding Invitations
Sunday, April 11, 2010
Engagement Party Planning
So my parents are throwing us an engagement party- and even better my mother is letting me help plan! :) The fun part is that it is totally relaxed compared to our wedding so we can do a lot of things that I love that would never had fit in with the wedding. Here's a few of the crafty things we'll be encorporating:
(All pictures found at Martha Stewart)
1. I love those postcard invitations- so we're going to make them using olive greed card stock, off-white envelopes pasted on the front, and then a few awesome stamps I found at Michaels' Craft Store.
2. The potted plants are actually going to be mint and thyme. The mint will have a little tag that reads :"Mint to be". While the thyme will have a tag that reads: "Thyme for a wedding". So adorable, plus if we decide to use them as favors we can do that easily.
3. The cup cake towers will rock all of our deserts and snackies. Of course the colors will be an olive green instead of the blue that the picture shows.
4. Martha says that these tissue paper pompoms are easy to make, so hopefully I can throw a bunch together in varying sizes of white tissue paper and we can hang them from the trees.
5. This sign will be made with the same font and paper as the tags in the mint and thyme. And of course it will read "Just Engaged" instead of "Just Married".
So this week, my to dos for the E-Party are as follows:
1. Set official party date (We're thinking of May 30th)
2. Finilize my guest list to give to my mom. (She'll be adding some friends of hers and anyone else that she'd like to invite who wouldn't be able to be invited to the wedding)
3. Make invitations
4. Attempt a practice run at those tissue paper pompoms
Wow, I'll be busy this week!
Forever Dreaming,
Katelyn
Labels:
decorations,
DIY,
Engagement,
Favors,
Inspiration,
Invitation,
Party,
Planning
Sunday, March 28, 2010
DIY Rustic Wedding Cake Stand
So I have wanted a rustic feeling wedding since I began planning. Not completely all out rustic, but lots of rustic touches. One idea that I fell in love with was the idea of using a piece of tree stump as a cake stand. Infact the idea came from this photo I found in one of my bridal magazines (I can't remember which one, sorry). Here it is:
Well as I was surfing around on the web today I found some other ideas using wood as your cake or dessert stands! Check out this DIY project on Once Wed!
Follow this link to see the DIY instructions, but isn't that adorable! And because you can change the style and hight so easily you could make a variety of stands for your dessert table. Oh I love it!
Forever Dreaming,
Katelyn
Well as I was surfing around on the web today I found some other ideas using wood as your cake or dessert stands! Check out this DIY project on Once Wed!
Follow this link to see the DIY instructions, but isn't that adorable! And because you can change the style and hight so easily you could make a variety of stands for your dessert table. Oh I love it!
Forever Dreaming,
Katelyn
Labels:
DIY,
Reception,
Reception Decor,
Wedding Cake
Sunday, March 14, 2010
Adorable DIY Bridesmaid Invitations
Here a few wonderful options for a DIY card to help you invite your friends/family into your bridal party.
(Each picture links to it's instruction page.)
Adorable aren't they? I think I might end up using the one from Martha Stewart.
Have a wonderful weekend everyone!
Forever Dreaming,
Katelyn
Labels:
DIY,
DIY Template,
Fun,
Invitation,
Template
Thursday, March 11, 2010
DIY Flowers: Manzanita Branch Centerpieces
I have always loved the look of flowered branch centerpieces, and now someone has finally let us in on the secret of how to make these eye catching beauties.
If you'd like to try this gorgeous look yourself follow this link.
DIY Wine Glass Lampshades
Check out this adorable project that is easy and pretty quick to make!
Find instructions for this project and the download-able template here. Talk about an easy project that you could do way ahead of time and just save until the day. I'm all for low stress!
Forever Dreaming,
Katelyn
Labels:
decorations,
DIY,
DIY Template,
Reception Decor
Monday, March 8, 2010
Wedding Scavenger Hunt
Here's a great idea to kill time between the ceremony and the reception (maybe while you and the groom are taking your photos) and also to help break the ice with the guests! Hold a wedding scavenger hunt! Have pencils and paper available for the guests, either at the escort card table when they walk in or at their own specific tables, along with a list of quirky things for them to find out about the other guests! Not only will it be fun and end up being a hit, but your guests won't realize it if your photo shoot runs a little longer than you expected.
Here's some fun things you could ask them to find out:
Someone who has an unusual job.
Someone who has been to another country in the last year.
Someone who always knew the bride and groom would get married.
Someone who has a funny story about the bride and groom.
Someone who has red hair.
Someone who has an older sibling.
Someone who was not born in the United States.
Someone who has lived on a farm.
Someone who has ran a marathon in the last year.
Someone who has a birthday in June.
Someone who has a mother named Barbara.
Someone who knew the bride and groom when they first met.
Someone who has went skydiving.
Someone who has known the groom since college.
Someone who has known the bride since elementary school (not including family).
Someone who has been married 30 or more years.
Someone who can juggle.
The possibilities are endless! So have fun and keep dreaming!
Forever Dreaming,
Katelyn
Sunday, June 28, 2009
Bridal Party - DIY Gift Bags
So today I threw a little bridal party for my friend KiKi (nickname) who was married exactly one month ago. (Happy One Month!) It was so fun but I wanted to share just how easy (and inexpensive) it is to make your own little gift bag!
What you need:
(1) Brown paper bags (12 for somewhere around $5)
(2) Various stamps and ribbons from Target's one dollar bins.


Then you just stamp in which ever color and which ever design you like, punch two holes on the top of the bag and tie some ribbon through, stuff with tissue paper and gifts and Ta-Daa! You're done!
How cute, the girls loved them. I baked some cupcakes, put out some snacks, and we were ready!

Hope you all have had a wonderful weekend!
Forever Dreaming,
Katelyn
What you need:
(1) Brown paper bags (12 for somewhere around $5)
(2) Various stamps and ribbons from Target's one dollar bins.
Then you just stamp in which ever color and which ever design you like, punch two holes on the top of the bag and tie some ribbon through, stuff with tissue paper and gifts and Ta-Daa! You're done!
How cute, the girls loved them. I baked some cupcakes, put out some snacks, and we were ready!
Hope you all have had a wonderful weekend!
Forever Dreaming,
Katelyn
Friday, March 27, 2009
DIY Invitation - Free Template!
I found this link on Once A Bride's blog and just had to share! Its a free template for some gorgeous invitations for all you out DIY brides out there. Take a look!
How gorgeous are those! I'm reminded of my grandmother's plates when I look at these and I love anything with a Victorian feel to it! The design is from Wedding Chicks and it is free to download if you click here.
Click here to see Once A Bride's original post and I hope you all have a wonderful weekend!
Forever Dreaming,
Katelyn
How gorgeous are those! I'm reminded of my grandmother's plates when I look at these and I love anything with a Victorian feel to it! The design is from Wedding Chicks and it is free to download if you click here.Click here to see Once A Bride's original post and I hope you all have a wonderful weekend!
Forever Dreaming,
Katelyn
Sunday, March 22, 2009
DIY Votive Wrap Templates
So as I was reading all of my favorite blogs today, I came across a fantastic and easy DIY project anyone can use on iDIY.

All you do is choose from the three FREE templates that The Fussy Designer created, print them out on vellum, stretch it around your votive tightly, and secure with double stick tape. How easy is that?! Feel free to click here for the original post!
Here are some of the designs you will find:
So get out, be crafty, and have fun!
Oh and PS: Today I am going to an open house in a wonderful venue for the Sacramento area: Arden Hills Resort and Spa. Hopefully I can take lots of pictures, get some factoids, and give you all the information sometime on Monday. But in the mean time, have a great weekend and do something new today. :)
Forever Dreaming,
Katelyn

All you do is choose from the three FREE templates that The Fussy Designer created, print them out on vellum, stretch it around your votive tightly, and secure with double stick tape. How easy is that?! Feel free to click here for the original post!Here are some of the designs you will find:
So get out, be crafty, and have fun!Oh and PS: Today I am going to an open house in a wonderful venue for the Sacramento area: Arden Hills Resort and Spa. Hopefully I can take lots of pictures, get some factoids, and give you all the information sometime on Monday. But in the mean time, have a great weekend and do something new today. :)
Forever Dreaming,
Katelyn
Saturday, March 21, 2009
Awesome Groomsman Gift - Loves it!
So while the boys are over playing Resident Evil 5 in the living room, I decided to do some bored internet searching. Well ladies it payed off! Check out this awesome DIY craft I found by Mrs Lovebird on the WeddingBee.com!

Not only was this a GREAT way to ask the guys to be the groomsmen, but it would be great even as a simply groomsman gift! Check out the link here for detailed instructions on how to take the Guinness label to the Groomsman label!

Not only was this a GREAT way to ask the guys to be the groomsmen, but it would be great even as a simply groomsman gift! Check out the link here for detailed instructions on how to take the Guinness label to the Groomsman label!

Sunday, March 15, 2009
Alternatives to the Guest Book
For those who don't know, I am in love with Wedding Wire, and while I was searching the message boards for interesting things I saw one girl asking for ideas for guest book alternatives. After a few minutes I had tons of ideas and thought I'd share a few of my favorites.
#1. The Wish Tree

Not only is this an adorable DIY project but its also a great alternative to the traditional guest book. Your guests sign a note or give some advice and simply hang it on the tree. At the end of the night you can just take the notes off, place them in a box, and either read them all at once or ration them off through out the year to come. And did you know that this is actually a Dutch wedding tradition? Fun factoids like that always make me feel full of wedding conversation starters! :) Now on to the next.
#2. The Wish Jar

Much like the wish tree, your guests write down a little message (or wish) to you and put it in the jar. Easy to transport and fun to read afterward since the guests will know that no one is going to see the note besides you and you will most likely end up with some great thoughts! By the way this picture came from My Dream Wedding.CA Shoppe where you can actually purchase it if you were interested.
#3. The Guest Puzzle
This was such a cute and unique idea I had to include it! For couples that love putting puzzles together this is not only a way to get messages from your guests but also a fun project for later! I found this on MGC Puzzles where you can purchase it (the price varies based on the size and number of pieces).

#4. The Wedding Recipe Cards
I actually saw this in the Bridal Guide magazine back in 2007 and it just stuck with me. There are many Wish Boxes you could chose from but I loved the idea of making it look like a box of cooking recipe cards. I found the following adorable box from Jean M. on her website for only $25.

As you can see there are many alternatives to doing the traditional guest book. Personally I'm torn between the wish tree and the recipe box. Hmm...decisions decisions.
Well hope everyone had a great weekend and got some good ideas from today's blog! And as always if you have any ideas, questions, comments, or funny jokes (I LOVE finding funny thinks in my email) feel free to email me at weddingsbykate.dream@gmail.com
Forever Dreaming,
Katelyn
#1. The Wish Tree

Not only is this an adorable DIY project but its also a great alternative to the traditional guest book. Your guests sign a note or give some advice and simply hang it on the tree. At the end of the night you can just take the notes off, place them in a box, and either read them all at once or ration them off through out the year to come. And did you know that this is actually a Dutch wedding tradition? Fun factoids like that always make me feel full of wedding conversation starters! :) Now on to the next.
#2. The Wish Jar

Much like the wish tree, your guests write down a little message (or wish) to you and put it in the jar. Easy to transport and fun to read afterward since the guests will know that no one is going to see the note besides you and you will most likely end up with some great thoughts! By the way this picture came from My Dream Wedding.CA Shoppe where you can actually purchase it if you were interested.
#3. The Guest Puzzle
This was such a cute and unique idea I had to include it! For couples that love putting puzzles together this is not only a way to get messages from your guests but also a fun project for later! I found this on MGC Puzzles where you can purchase it (the price varies based on the size and number of pieces).

#4. The Wedding Recipe Cards
I actually saw this in the Bridal Guide magazine back in 2007 and it just stuck with me. There are many Wish Boxes you could chose from but I loved the idea of making it look like a box of cooking recipe cards. I found the following adorable box from Jean M. on her website for only $25.

As you can see there are many alternatives to doing the traditional guest book. Personally I'm torn between the wish tree and the recipe box. Hmm...decisions decisions.
Well hope everyone had a great weekend and got some good ideas from today's blog! And as always if you have any ideas, questions, comments, or funny jokes (I LOVE finding funny thinks in my email) feel free to email me at weddingsbykate.dream@gmail.com
Forever Dreaming,
Katelyn
Saturday, March 14, 2009
Adorable and unique!
I found this on a blog that I have been reading, From Diamonds to Vows. It was the first I had seen anything like it and I fell in love immediately (as is usually my way). Aren't these rock chandeliers adorable!

Now she may not have the time to make them after all, but I just couldn't let them go to waste! Maybe these little beauties can make an impression at your own wedding.

Remember to check out the link below because she even included detailed directions on how to make them. Enjoy!
Forever Dreaming,
Katelyn
from diamonds to vows: exhibit b

Now she may not have the time to make them after all, but I just couldn't let them go to waste! Maybe these little beauties can make an impression at your own wedding.

Remember to check out the link below because she even included detailed directions on how to make them. Enjoy!
Forever Dreaming,
Katelyn
from diamonds to vows: exhibit b
Subscribe to:
Posts (Atom)


