Showing posts with label Tips. Show all posts

Tuesday, August 3, 2010

DIY Centerpiece Ideas

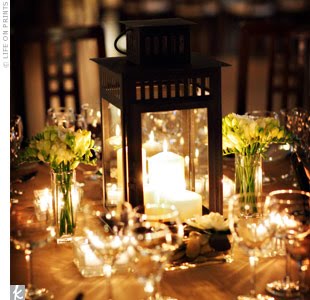
So I have been playing around with DIY centerpieces for a while and I think I know what I'm going to do...here's what I've come up with so far. World Market sells these lanterns that are nice and big- you can fit three candles inside and they are so cute! Here's what I was thinking of:


I was thinking of placing a few grey river rocks around the lantern with either tulips in a vase like above or a few more candles. I grabbed the rocks from a place down the road to try out the idea of placing rocks around the lantern, here's how it turned out:
I like it- of course I'd replace those rocks with smooth ones like these:
I think it will turn out well. :)
Forever Dreaming,
Katelyn

Sunday, April 25, 2010

Creating my Invitations

So today was the day I was going to make all my engagement party invitations. Last night I cut the paper, today I got grey stamp ink, and as I went to load the paper into our printer it suddenly hit me...we don't have white ink. Bummer! I already tried the invitations with black ink and here is what it came out like:
(Ignore the smudge marks on the envelope...I dropped a stamp on it. lol)
So you see, the black doesn't look terrible but I think white text against the green would look much better. But anywho, here's the invitation making process so far:

Materials Bought:
10 pieces of 12x12 olive green cardstock paper....$6.90 ($.69 each)
1 9" Fiskars bypass trimmer (as seen below)..........$19.99
4 packs of 12 note cards-only for the envelopes.....$4.00 ($1.00 each)
1 fifty count 8x11 white cardstock paper................$3.99
2 stamps on clearance (as seen below)...................$1.98 ($.99 each)
                                                              total cost: $36.86

Why this ended up being a total bargin:
The trimmer I will be using forever more, for things such as gift tags, cards to friends, crafts, etc. The same with the stamps (who doesn't love a cute little owl?). The white pack of cardstock paper I will be using to make my banners, save the dates, stationary. and who knows what else more.

And finally- my best bargain find- The 4 pack of note cards with envelopes came to a total of $4 which totally beat the plain cardstock note card with envelope pack which was $4.75 for a pack of 10. Tadah! I felt great walking out of there with out spending the $50 I originally thought I was going to have to spend.

Now for the creation process:

Step 1: Cut cardstock paper into whatever size you need. (My invitations are 4"x7.5".)

Step 2: Print out whatever text you like onto your cardstock paper. Mine read "It's the little things you do, that truly say "I love you". (cute, huh?) Also print out the text on your small cardstock paper for the insert card (the one you place in the envelope).

Step 3: Using a glue stick, glue your envelope (back side up) onto your card in the designated area.

Step 4: Stamp adorable designs where ever you would like.


Step 5: Apply postage stamp and mail these cuties off!

Send me some pics of what you're working on!
Forever Dreaming,
Katelyn
Monday, April 19, 2010

Finding a Venue

Finding a venue for our ceremony and reception has proven to be the most stressful decision.so far. Because of our limited budget plus my semi-specific vision, I have been looking for almost 2 months (officially) and still haven't found anything promising. I did however come up with a very organized and useful chart that I'd like to share. Trust me it helps to have something you can glance at to remind yourself of important details rather than looking up the websites one at a time. So here we go!

Venues:
Miners Foundry
Centerville Estates
Fri/Sun. Prices:

$4,458*
Sat. Prices:

$4,990*
Distance from RB:
133.87 mi.
2hr 44min
68.48 mi.
1hr 43min
Distance from RC:
55.12 mi.
1hr 13min
109.9 mi.
2hr 09min
Insurance:
Min $500,000 req.

Vendor Limits:


Time Limits:
Whole day
9am-11pm
Parking:
Yes
Yes- Directed.
Set up and Clean up:
$25/hour with a 3 hour min.
Clean Up
Tables and Chairs:
Many options
Yes - wooden
Linens:
At extra cost

Dishes:


Included Décor:
Candelabras, Hurricane Oil Lamps
Umbrellas
Coordinator:
No.

# of Events:
1
1
Max # of Guests:
200 for stone hall

Taxes or Other Fees:


Bathrooms:
Yes
Yes, 3
Dressing Rooms:
Bride
Bride & Groom
Bar:
Available
Indoor & Outdoor
Backup for Rain:

Indoor Space
Misc. Pros:

Electricity outside
Misc. Cons:


Dance Floor:

Indoor & Outdoor
Venue Amenities:
Historic, Stone Walls, Indoor
River, Lawns, Patios
Website:
Minersfoundry.org
Centervilleestate.com
Centerville estates: * possibly less for a small guest list

I was trying to get the chart to fit into your view, but I think it may still cut off a few letters. Usually my chart is about 4 venues wide. I currently have about 4 pages of this plus more info to update and venues to add . You can add or change the rows to whatever is important to you. Oh and in case anyone starts to wonder, RB is where most of our family is located and RC is where we're located. 

I cannot wait until we decide on a venue! Things will get so much easier. :) Hope this helps everyone- I know it made things easier for me.
Forever Dreaming,
Katelyn

Wednesday, March 10, 2010

I'm engaged!...now what?


Ok so I'll admit, I am still to excited to actually focus on anything at the moment, but I did manage to put together a little to do list for us to follow.

1.       Announce your engagement
Shout it out! Tell family and friends however you would like but be sure to not let the stress get to you. If they start asking about the wedding date and you haven’t set one yet just let them know that you’re really just enjoying being engaged and that they’ll be the first to know when you do decide. Just remember – they’re excited for you and that’s why they’re asking! Even though it may be stressful, just know that they mean the best and be sure to take the time to bask in your new status.
2.       Imagine your dream wedding
 I know you’ve been thinking about it for a while now, so sit and think how would you want it? Without worrying about budget, guests, or any of the things that come up late have some fun and decide on the theme or feel you will want your wedding to have. Be sure to talk to your fiancé about this, he may have something I mind that you never would have guessed.
3.       Get organized
Plan where you’re going to keep all your thoughts, plans, details, and lists. My advice? A giant binder. That way you can easily move it from place to place. But what it is doesn’t matter – it could be a shoe box if you knew exactly where to find things.
4.       Set your budget
This is the least fun wedding thing but also the most important. In order to help you from stressing out about the credit card debt you’re piling up on wedding décor – sit down with your FH and whoever else may be contributing and find out exactly what you have to spend on your fairy tale wedding. Then, with your FH, decide on the three most important aspects of your wedding day. Is it the photography, the food, the music, or the décor? This will let you know what things you may want to splurge on and where you can really cut back. For me, I really don’t want a videographer – but photography and the venue is a big deal for me.  So I can adjust my budget accordingly. And while it may be a little more work, it is still possible to have the wedding of your dreams while on a budget. You just need to focus on what is important to you and use a little magic dust.
5.       Pick a date
This is a little tougher. I’d suggest picking a few dates, like maybe three, that will work for you, your fiancé, and your families. Having multiple dates set aside will help you be able to still get the venue you’d like. That way if it turns out to be booked on one of your days, you always have two more to choose from. Also remember, if you are planning a budgeted wedding, some dates will be less expensive than others. Consider having a wedding in the “off” season where you might find some incredible discounts. Some things to consider, according to the Knot, are the symbolism of your date (what does it mean to you), the season, the price (like I stated above), holidays, VIP preferences (can your family make it?), and any major dates to avoid.
See here for a list of dates to avoid in 2010 and 2011.
6.       Make a first draft guest list
My FH and I are paying for almost all of the wedding (if not everything)so technically I didn’t have to invite any of the people our parents wanted, but to me it was important that they each choose a few people who are important to them to have at our wedding. In order to do this while still keeping a handle on our small (50-75 guests) and budgeted ($5000) wedding I asked them to make a “dream list”. They can write everyone down that they would like to invite, I ask them who matters the most to them on this list, and then I drop the ones I don’t know or don’t need to have at the wedding. And voila – I have a manageable guest list where I know and care about  mostly everyone invited but our parents still get to have a few of their closest and dearest with them.
7.       Find the ceremony and reception venue
Some of you out there will be shocked when you start looking into venues. These things are booking up fast! One place I’ve looked in the past had dates booked for the next 2 years! So as soon as you get the above things figured out I suggest you start looking around and touring some of the places. Also, if budget is an focus for you, remember that the more unique the venue is – it usually costs less.
8.       Pick your colors
I actually did this way before we got engaged. But it may be easier to pick the colors after picking the venue. That way you can use the venue in your decorations. Find a ball room with a blue and brown floor? Consider using one of those in your wedding. Decorating will get much easier. (In my case, because I am so set on my colors – I’m actually trying to find a venue that fits my vision.)
9.       Pick your attendants
Pick them as soon as you are sure of whom you want to be a part of your day. You will have even more fun planning and searching for things if you have your favorite bridesmaids to do it with!
10.   Start looking for vendors
I have a giant binder filled with tons of these guys and soon I will need to go through and start thinning out the herd. Hehe. Better Homes and Gardens suggests finding your photographer, caterer, videographer, and florist at the 10-month mark. Some things to consider when looking for a vendor is your vision of the wedding, the different types of possibilities, for instance photography has photojournalistic, artistic, and traditional (you may want to familiarize yourself with a few key terms before interviewing). And be sure to interview multiple people, other people may click with you more than the first you see.
11.   Look for dresses
Better Homes and Gardens suggests starting to looking 7-10 months in advance to allow enough time for ordering and alterations. The Knot also suggests that you study up on your wedding dress 101 before you go, “Learn the lingo before stepping foot in a dress salon. Read up on silhouettes, necklines, trains, and hues that might flatter you. Season will also affect your choice. Getting married in the sweltering summer? Go with lightweight fabrics such as chiffon, linen, or organza. Having a winter wedding? Brocade, faux fur, and velvet fabrics will keep you warm. Satin, shantung, silk, and tulle are perfect year-round.”
12.   Book hotel rooms (if needed)
I like the idea of booking out blocks of rooms for your guests and including the hotel options in your save the dates. This way your guests won’t be stressed about having to find a hotel room close enough to the venue.